I have done SO much in this first week. There's so much to share that I'll have two posts. This one and another tomorrow.
Tailoring Considerations
I started the week reading through this book in the mornings with coffee. I only have the kindle version, which was a mistake. A book of this sort really needs to be physical to facilitate referencing different parts. Also, the digital formatting is terrible.
Still, the information inside is really valuable. I've decided that based on the type of coat Fari is designed to be, I will only be doing some light tailoring to support the wool and some of the special details:
As I work through the actual construction, I may need to adjust this list. I've also decided that with the exception of the back stay, I will be using fusible interfacing throughout the project, including the collar, facings and trim bands.
Tailoring Techniques:
- Adding a back stay to prevent stretching during wear.
- Use the weft interfacing in my stash, not the woven interfacing from Joann's.
- Use fusible horsehair interfacing for the collar.
- Consider raglan shoulder pads to avoid droopiness.
- Do I need raglan sleeve stays?
- Use cotton twill tape to stabilize the raglan sleeve seams.
- Interfacing to support the welt pockets that are part of the pattern.
- Making bound button holes on the cuff tabs and collar instead of regular holes.
With those plans out of the way, it's was time to actually DO something. Yet...I found myself paralyzed and wasting away my sewing minutes. Why was I procrastinating? What if I made a mistake? What if I skipped something vital that I don't even know about? Do I have enough knowledge to do it right...to make it perfect? I can admit that I'm scared of messing up and failing because I know I'm not alone. How many of you have similar fears? Many, I'm willing to bet.
I'm going to make mistakes. I will fail to use correct techniques. There is no way it will be "perfect". I decided an imperfect coat made earnestly with joy is better than letting it live only in my imagination. So, I opened up the instructions and just got started.
Getting Started
The first thing I did was mark buttons, tabs, pleats and welt pockets on the various pattern pieces. I used little sticky page markers to make sure I didn't mix up the front and back sleeve pieces. Then I immediately stitched up the pleats. Actually, I didn't stitch them as pleats, they are more of a released tuck. I straight stitched the length of that line marking to control the volume near the cuff. I pressed them open like a box pleat to keep them nice and flat.


Of course, immediately after, I started to question not having interfaced the sleeves at all. Recommendations from the Sewalongs & Sewing Contests group suggested that I DO interface them to ensure my collar has enough support to stand properly. Rather than unpick my tucks, I chose to only interface the top portion of the sleeve. The thickness of the fabric combined with the drape of the released tuck means there is no visible line of demarcation on the right side of the sleeve.

Stays 'N Things
Before I could begin stitching my sleeves to the back pieces, I needed to insert a back stay. As I mentioned above, I used this blog post from Sewaholic as my guide. I pretty much did exactly the same thing Tasia did. I measured down approx 9 3/8 inches from the neck line and 3 3/8 inches down from the sleeve, joining them with a gently curing line. I marked the seam lines along the center back, matched them up and zig-zagged them together.


Not too shabby, eh?

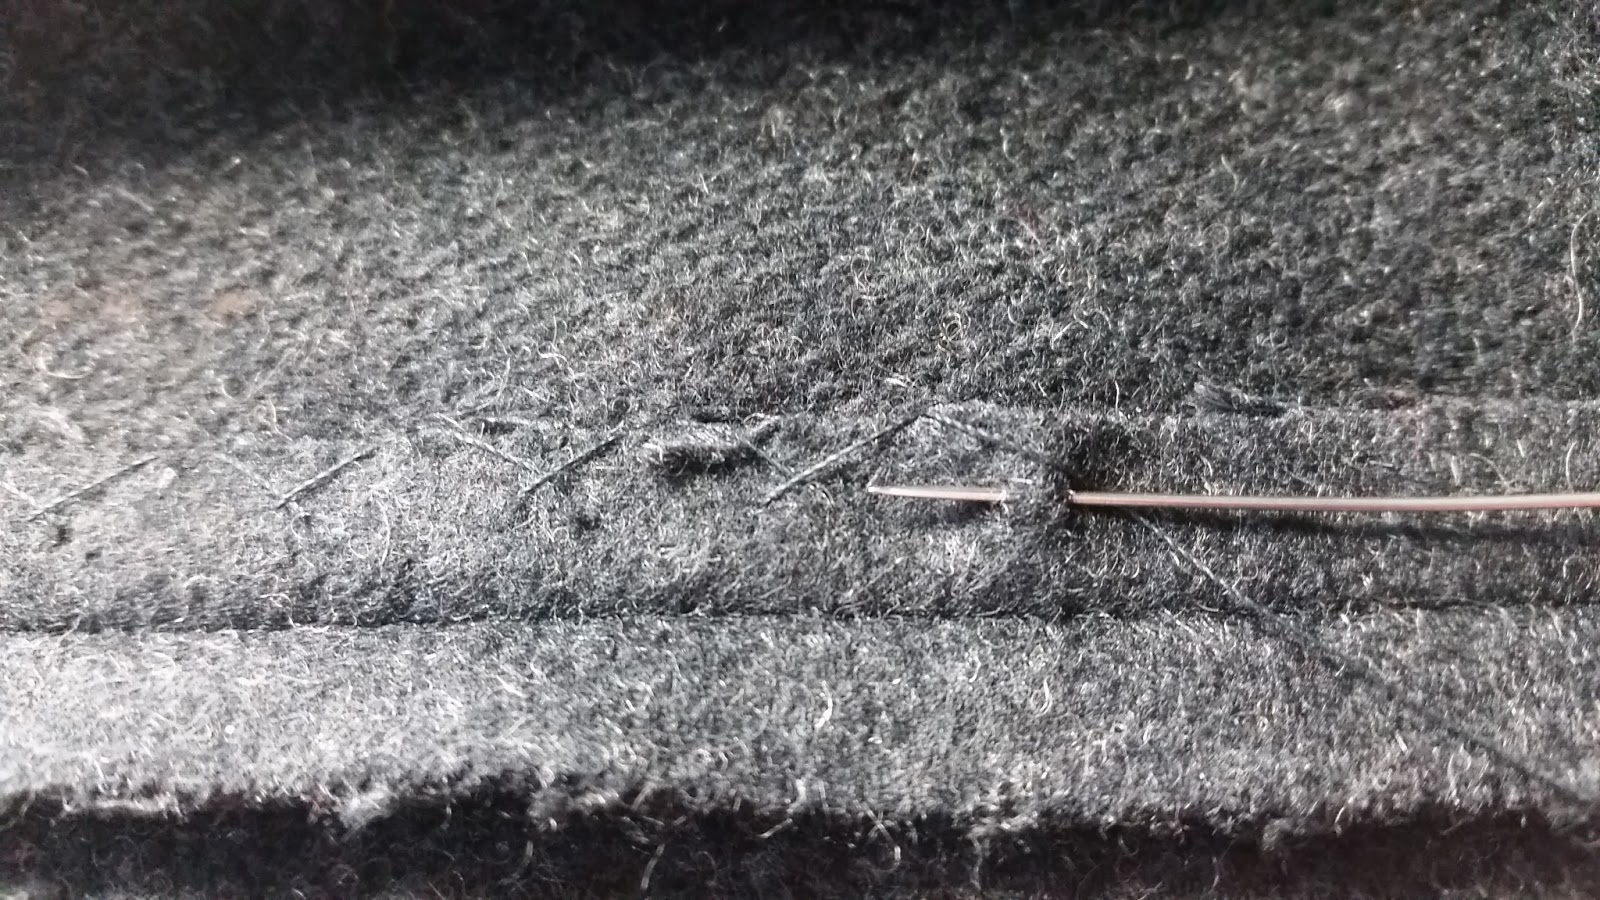
Before I could baste the back stay into place, there was one detail I had to complete: Catch stitching the seam allowances flat. I don't want them to rub or stand out funny after the lining is installed.

In case you are new around here: I Love Catch Stitching.
By Saturday Night...
By Saturday night I was in a great place. Fronts and backs of the sleeves are attached, (but not at the top of the shoulder yet). The back stay in installed. My sleeves are interfaced, tucks stitched and it is draping nicely.


Plus, All the seams are catch stitched down.

This isn't all I accomplished this week. Tomorrow I will talk in detail about my sleeve tabs and their button holes!
Which techniques are you using to make your Coat?
Share your inspiration and project plans with us in our Group's Facebook Page, Sew Alongs & Sewing Contests, and share what you are working on this week!
Have you missed one of the Coat Cravings posts? Find all the links HERE.
Comments
Post a Comment